

Titration results can be inaccurate even when the procedure appears simple. The most common causes are unconditioned glassware, contamination, air bubbles, parallax error, incorrect burette calculations, poor endpoint control, unsuitable indicators, unstandardized titrants and inconsistent technique between trials. This guide explains how to identify and prevent these beginner mistakes.
Why Titration Results Go Wrong
A titration depends on several connected measurements: the amount of sample transferred, the concentration of the titrant, the volume delivered from the burette and the endpoint selected by the analyst. A small error in any one of these steps can shift the calculated concentration or make replicate titres disagree.
It helps to separate errors into two groups:
- Systematic errors push results consistently high or low, such as using the wrong indicator or an unstandardized titrant.
- Random errors reduce repeatability, such as inconsistent swirling or estimating the meniscus differently between trials.
Troubleshooting should identify whether the problem affects accuracy, precision or both.
The Core Titration Calculation
For a simple 1:1 reaction, the relationship is:
CanalyteVanalyte = CtitrantVtitrant
The volume delivered from the burette is:
Vdelivered = Vfinal – Vinitial
For reactions with different stoichiometric ratios, include the mole ratio in the calculation. Never treat the final burette reading as the volume used. A burette reading shows the position of the meniscus on the scale; only the difference between the final and initial readings gives the delivered volume.
Example calculation
| Measurement | Reading |
|---|---|
| Initial burette reading | 0.20 mL |
| Final burette reading | 24.65 mL |
| Delivered volume | 24.45 mL |
Delivered volume = 24.65 mL – 0.20 mL = 24.45 mL
Record every reading immediately and use the decimal places supported by the burette and laboratory method.
Mistakes Before Titration
Using unconditioned glassware
Rinsing a burette or pipette only with distilled or deionized water can leave residual water that dilutes the solution subsequently delivered or transferred. After cleaning, condition a burette with a small portion of the titrant and condition a pipette with the solution it will transfer, following the written laboratory procedure.
Do not condition glassware with the wrong reagent, and never return excess rinse solution to the stock bottle.
A wet receiving Erlenmeyer flask is different. If the remaining water contains no reacting species, it generally does not change the amount of analyte in the flask. Residual water in a burette or volumetric pipette can change the concentration or composition of a measured transfer, so the consequence depends on the vessel and the measurement being made.
Working with dirty or contaminated glassware
Residues from a previous reagent, detergent, sample or cleaning solution can react with the new contents or prevent uniform wetting of the glass. Contamination can affect both the chemistry and the volume delivered.
Before starting:
- Inspect the glass for films, droplets, particles and scratches.
- Rinse thoroughly according to the laboratory procedure.
- Confirm that the glassware is clean and wets uniformly.
- Discard any solution whose identity or concentration is uncertain.
Failing to check the burette
Clamp the burette vertically and inspect the stopcock, tip, graduations and outlet before filling. A leaking stopcock can change the delivered volume while the apparatus is standing, while a damaged tip can make flow control irregular.
Choose a burette size appropriate for the expected titre. An unnecessarily large burette may contribute a larger absolute reading tolerance than a smaller suitable burette.
Leaving the funnel in place
A funnel can make filling easier, but remove it before taking the initial reading and before titration begins. Drops draining from the funnel can enter the burette after the initial reading and add unmeasured titrant.
Leaving an air bubble in the tip
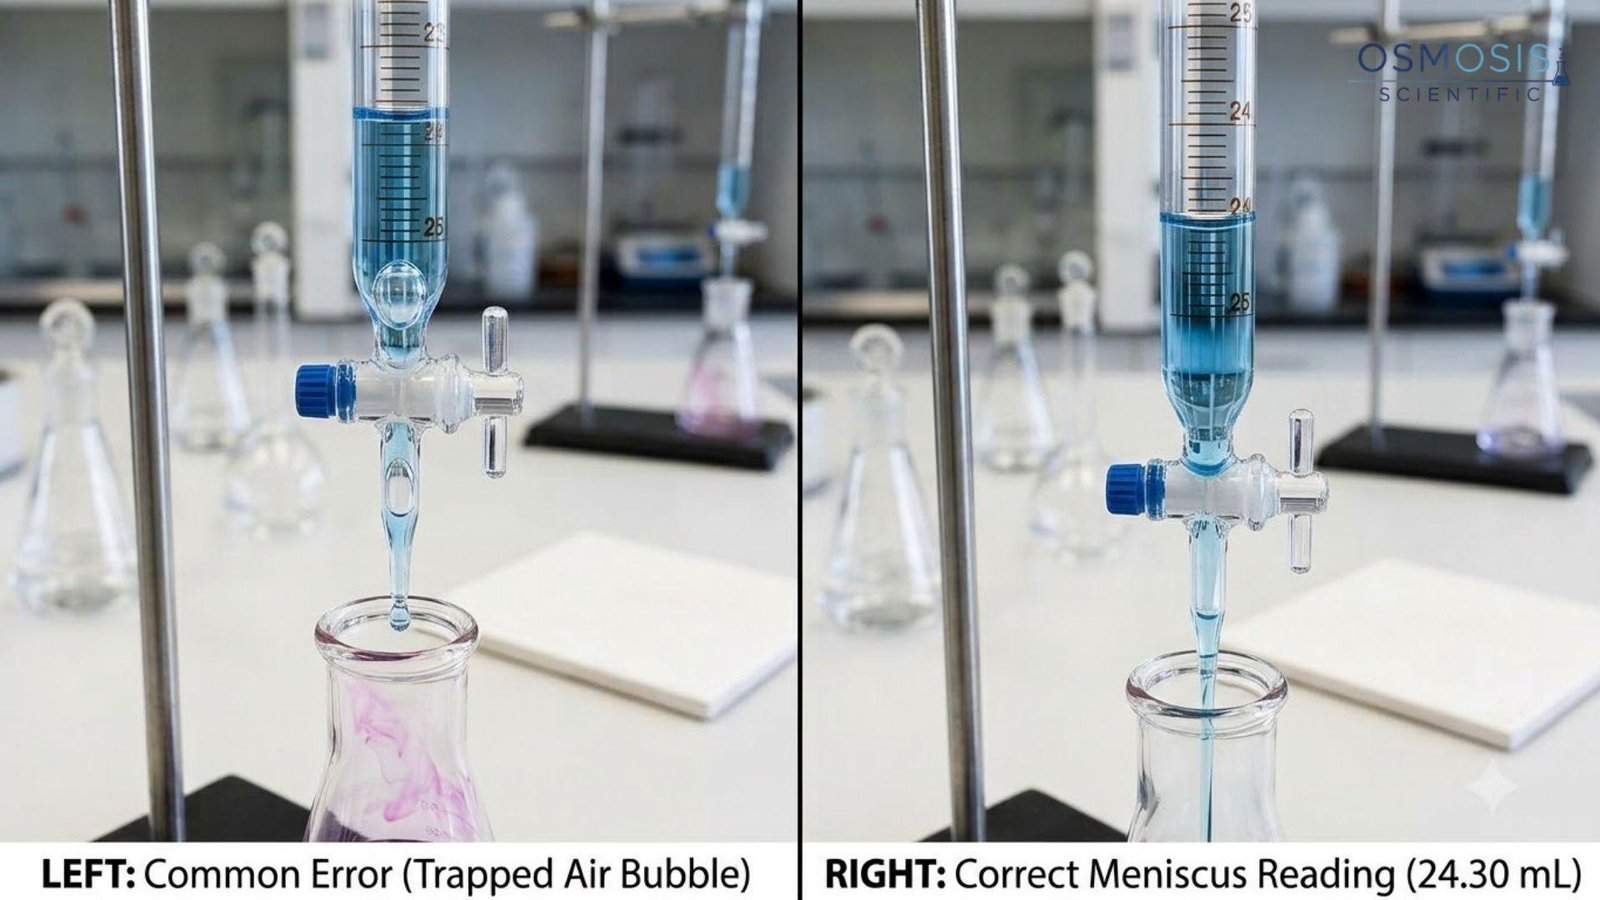
An air pocket in the burette tip initially occupies space that should contain titrant. When the bubble is released, the burette reading can suggest that titrant was delivered even though some of the liquid only filled the tip.
After filling, open the stopcock and flush solution through the tip until the bubble disappears. Check the outlet again before recording the initial reading.
Reading and Delivering Volume
Reading the meniscus from above or below
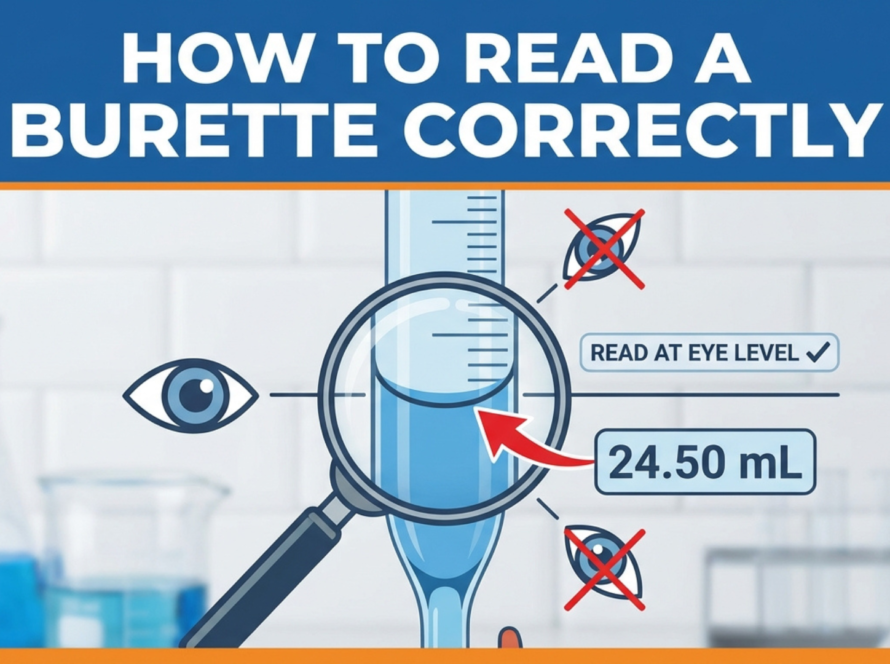
Viewing the burette from an angle causes parallax error: the apparent position of the liquid changes with the observer’s eye position. Keep the burette vertical and bring your eye level with the meniscus before recording both the initial and final readings.
For most aqueous liquids with a concave meniscus, read the bottom of the curve. A white background or reading card can improve contrast and make the meniscus easier to see.
Also Read- How to Read a Burette
Mixing up the burette scale
Burette graduations increase downward. As liquid is delivered, the final numerical reading is normally larger than the initial reading. Do not read the scale like a graduated cylinder, and do not write the final reading as the delivered volume.
Use a simple record format:
- Initial reading: _______ mL
- Final reading: _______ mL
- Delivered volume: final – initial = _______ mL
Adding too fast near the endpoint
Rapid additions are useful during a rough titration, but they are risky near the endpoint. One drop can move the solution past the target, especially when the sample concentration is low or the endpoint transition is sharp.
As the endpoint approaches, reduce the flow to individual drops or half-drops while continuously swirling. A faint, persistent colour change is generally preferable to a dark or intense colour when the method defines the endpoint that way.
Letting drops remain on the flask wall or burette tip
A drop on the inside wall may not immediately mix with the bulk solution. Liquid hanging on the outside of the burette tip may fall later and be counted incorrectly.
Keep the tip inside the flask without touching the liquid or glass. Swirl continuously, and wash down the flask walls with a small amount of distilled water when the method calls for it. Adding water to rinse the walls does not change the moles of analyte, provided no reacting material is lost.
Splashing or losing sample
Vigorous swirling can eject solution, and a poorly positioned tip can cause titrant to miss the flask. Any measurable loss of reacting material invalidates the mole balance.
Swirl enough to mix thoroughly without splashing, keep the flask under the tip and stop the trial if sample or titrant is lost. Record the event and repeat the experiment rather than trying to repair the calculation.
Endpoint Problems
Confusing endpoint with equivalence point
The equivalence point is the theoretical stoichiometric point at which the reacting amounts are chemically equivalent. The endpoint is the observable signal used to stop the titration, such as an indicator colour change.
The two points are close only when the indicator’s transition range is appropriate for the reaction. They are not automatically identical.
Choosing the wrong indicator
An indicator should change colour over a pH range that brackets the steep portion of the titration curve near the equivalence point. A clear colour change can still produce a wrong result if it occurs at the wrong pH.
For example, an acid-base analysis whose equivalence region is near pH 5 requires an indicator that changes in that region. An indicator that changes much higher on the pH scale can produce an endpoint volume that does not represent the intended reaction point.
Adding too much indicator
The indicator is itself a reagent. Adding more than the prescribed amount can alter solution chemistry and shift the endpoint, especially in low-capacity or sensitive procedures.
Use the specified number of drops or concentration, and use the same amount in every replicate.
Stopping at a temporary colour flash
A local colour plume where titrant enters the flask is not necessarily the endpoint. Continue swirling and observe whether the colour disappears.
For a phenolphthalein method, the endpoint may be defined as the first faint pink colour that persists for a specified time. Follow the exact persistence criterion in the laboratory method rather than relying on a general visual guess.
Continuing after a stable endpoint
Once the prescribed endpoint is reached, stop immediately and record the final burette reading. A dark or intense colour usually indicates that excess titrant has been delivered.
If the endpoint is substantially overshot, mark the trial as overshot and repeat it. Do not try to correct the same flask by adding another reagent.
Solution and Chemistry Mistakes
Using nominal titrant concentration without standardization
The concentration printed on a bottle is not always the concentration that should be used in a high-quality calculation. Some titrants change during storage or handling, so their titer should be determined against an appropriate primary standard or reference procedure at the frequency required by the method.
Sodium hydroxide, for example, can absorb carbon dioxide from air and form carbonate, reducing its effective hydroxide concentration. Protect it appropriately and standardize it as required.
Allowing temperature to vary
Volumetric glassware and solutions expand or contract with temperature. This can affect volume-based measurements, especially during precise work or when samples and standards are at different temperatures.
Allow solutions to equilibrate as required by the method, avoid warming volumetric glassware with your hands and record unusual temperature conditions.
Failing to dissolve or transfer the entire sample
If solid remains undissolved, solution is left in a transfer vessel or droplets are not rinsed into the reaction flask, the flask contains fewer moles than assumed.
Dissolve the sample completely, rinse transfer vessels and flask walls as directed and verify that no residue remains before titration.
Using the wrong reagent or concentration
Label confusion, copying errors, degraded solutions and contaminated stock bottles can create results that look like technique problems. Before starting, check reagent identity, concentration, preparation date, storage conditions and standardization status.
If a result is implausible, verify the reagent bottle and calculation before repeating the same technique blindly.
Replicates and Data Quality
Treating every titre as equally valid
A rough titration helps locate the endpoint but should not normally be averaged with careful trials. Subsequent trials should approach the endpoint consistently and produce close, concordant titres according to the laboratory’s acceptance rule.
If one value is an outlier, investigate overshooting, bubbles, leaks, inconsistent endpoint judgment and calculation or transcription errors before excluding it.
Changing technique between trials
Changing the indicator amount, swirl pattern, endpoint colour, reading position, drop size or rinse procedure between replicates adds avoidable variation. Keep the procedure constant and record any deviations.
Consistency improves precision, but it does not correct a systematic error such as a wrong indicator or unstandardized titrant.
Reporting false precision
A burette reading cannot support unlimited decimal places. Report readings and calculated concentrations only to the precision justified by the glassware, method, replicate spread and uncertainty assessment.
More digits do not make a result more accurate. They can instead give a false impression of certainty.
Fast Troubleshooting Table
| Observation | Likely cause | Immediate check or fix |
|---|---|---|
| First titre is much larger than later titres | Overshot endpoint, released air bubble or rough trial included | Exclude the rough trial from the mean; inspect and prime the tip; slow down earlier |
| Replicates vary widely | Inconsistent endpoint judgment, poor mixing, leaks, bubbles or reading errors | Standardize the endpoint criterion; swirl consistently; check the burette and readings |
| All results are consistently high | Endpoint overshoot, wrong indicator, diluted analyte or titrant concentration too low | Check indicator range, conditioning, standardization and endpoint colour |
| All results are consistently low | Stopping too early, wrong indicator, titrant concentration too high or sample loss | Confirm endpoint persistence and reagent concentration; check transfers |
| Colour appears and then disappears | Temporary local mixing colour or endpoint not reached | Swirl thoroughly and add titrant dropwise |
| Colour is suddenly dark or intense | Endpoint overshot | Record the trial as overshot and repeat |
| Burette reading changes while waiting | Leak or stopcock problem | Empty, clean and inspect the burette; repair or replace before use |
| Titrant flow jumps or pauses | Air bubble, blocked tip or faulty stopcock | Flush the tip, remove bubbles and check flow before restarting |
| Meniscus is difficult to see | Poor lighting, dirty glass or insufficient contrast | Clean the glass, use a white background and read at eye level |
| Results drift during a session | Temperature change, titrant degradation or gas absorption | Control temperature, protect the titrant and restandardize if required |
Beginner’s Preflight Checklist
Before starting the titration, confirm the following:
- Check the reaction equation, stoichiometric ratio, analyte identity, titrant identity and expected endpoint.
- Confirm that the burette, pipette, flask and indicator are clean, correctly labelled and suitable for the method.
- Condition the burette and pipette with the appropriate solutions; do not confuse conditioning with rinsing with water.
- Clamp the burette vertically, remove the filling funnel and remove all bubbles from the tip.
- Record the initial burette reading at eye level using the correct meniscus and scale direction.
- Add the prescribed amount of indicator and mix the sample completely.
- Use a rough run only to locate the endpoint region; add titrant dropwise near the endpoint.
- Use the same endpoint criterion for every trial and record the final reading immediately.
- Calculate delivered volume as final minus initial, then apply the correct stoichiometric ratio.
- Compare careful trials, investigate outliers and report only justified precision.
Safety Note
Wear the required eye protection, lab coat and gloves. Treat acids, bases, indicators and unknown samples as potentially hazardous.
Never mouth-pipette. Keep the burette tip directed into the receiving flask, clean spills according to the laboratory procedure and consult the relevant safety data sheet and local laboratory instructions.
This guide does not replace the specific safety rules or validated method supplied by your teaching, quality-control or analytical laboratory.
Osmosis Scientific Guidance
At Osmosis Scientific, we believe reliable titration begins with reliable laboratory glassware and consistent technique. A clean, correctly selected and properly inspected burette helps reduce avoidable variation in routine analytical work.
For laboratory burettes, clamps, titration glassware or bulk requirements, contact Osmosis Scientific with your required capacity, accuracy class and application.