Burettes are precision instruments, not just tall pieces of glass. Burette Maintenance & Cleaning is what keeps them trustworthy, batch after batch, instead of slowly turning into hidden error sources in your titrations.
Why Burette Maintenance & Cleaning Matters
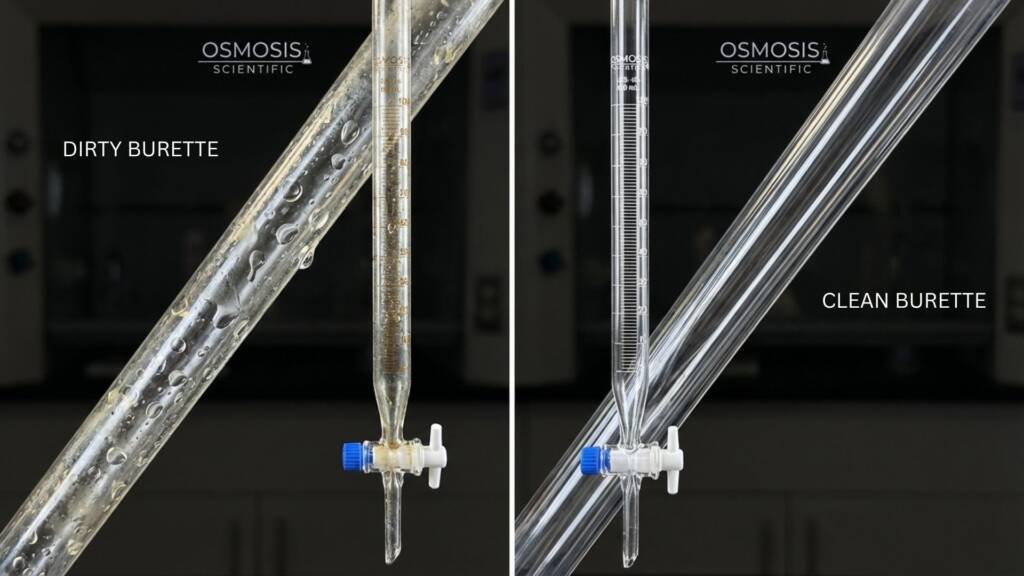
The accuracy of a burette depends on two things: a clean, hydrophilic internal surface and a smooth, leak‑free stopcock. Any film of grease, dried salt, or etched glass makes liquid “bead” instead of forming a continuous sheet. This means less volume is actually delivered than the scale suggests.
In regulated or QC environments, that translates directly into drift in assay results and failed audits—even if the burette is nominally Class A and “within tolerance.”
Daily Burette Maintenance & Cleaning Checklist
Use this quick routine every time you finish a titration session. It takes a few minutes and prevents most long‑term issues.
1. Immediate Rinse After Use
- Flush: Rinse the burette with tap water as soon as you are done, then flush with distilled or deionized water; never let reagents dry inside the tube.
- The Roll: With the stopcock closed, add distilled water, tilt and roll so all inner surfaces are wetted, then open the stopcock to drain through the tip.
2. Detergent Clean (If Needed)
- Wash: If droplets, stains, or films remain, wash with warm water containing a small amount of laboratory detergent (e.g., Alconox) and a soft burette brush.
- Rinse: Rinse thoroughly with tap water until all detergent is gone, then give a final rinse with distilled water so no residue is left behind.
3. Visual & Leak Inspection
- Check: Inspect the barrel and tip for chips, star fractures, cloudiness, or worn graduations. Remove damaged burettes from service immediately.
- Leak Test: Fill with water, dry the outside, and observe for several minutes. Any seepage around the tip or stopcock indicates a leak that must be fixed before the next run.
4. Correct Drying & Storage
- Drain: Allow the burette to drain vertically, tip down on a towel. Loosely cover the top to keep dust and aerosols out.
- Store: Store upright in a rack with gentle clamping. Never store horizontally or under mechanical stress.
Weekly Maintenance: Stopcock & Seals
Once a week—or sooner in heavy‑use labs—give extra attention to the moving parts.
Disassemble the Stopcock
- Remove the glass key or PTFE plug and any O‑rings or washers.
- Wash each part in warm detergent solution.
- Critical: Use only soft brushes and avoid letting any metal spine touch the glass bore to prevent micro‑scratches that can become crack starters.
Rinse, Dry & Lubricate
- Glass Stopcocks: Apply a very thin film of suitable stopcock grease away from the bore. Too much grease risks contamination and blockage.
- PTFE Stopcocks: Leave the plug itself grease‑free. Lightly lubricate only O‑rings or threaded parts if needed for smooth operation.
Reassemble & Test
- Reassemble the stopcock and run water through it to confirm smooth rotation and a tight, drip‑free seal.
- If it still sticks, dismantle and clean again rather than forcing the plug, which can crack the barrel or deform PTFE by “cold flow.”
Occasional Deep Cleaning
When routine washing no longer gives a continuous water film, step up to targeted deep‑cleaning rather than scrubbing harder.
1. Removing Mineral Deposits
For hard‑water films or scale, fill the burette with a dilute mineral acid (such as low‑strength hydrochloric or nitric acid) and soak for 10–30 minutes.
- Safety: Work with full PPE. Strong or hot acids can attack glass and stopcock components.
- Neutralize: Rinse immediately with plenty of tap water until neutral, then follow with distilled water.
2. Removing Organic Residues
For grease and organic films, rinse or soak with a suitable solvent (ethanol or acetone) or use a warm mild sodium carbonate solution.
- Ensure good ventilation and follow your solvent‑handling procedures.
3. What to Avoid
- Avoid Chromic Acid: It is toxic, environmentally problematic, and unnecessary given modern detergents.
- Avoid Caustic Soaks: Long alkaline soaks can dissolve the glass surface, etch graduations, and permanently alter calibration.
FAQs
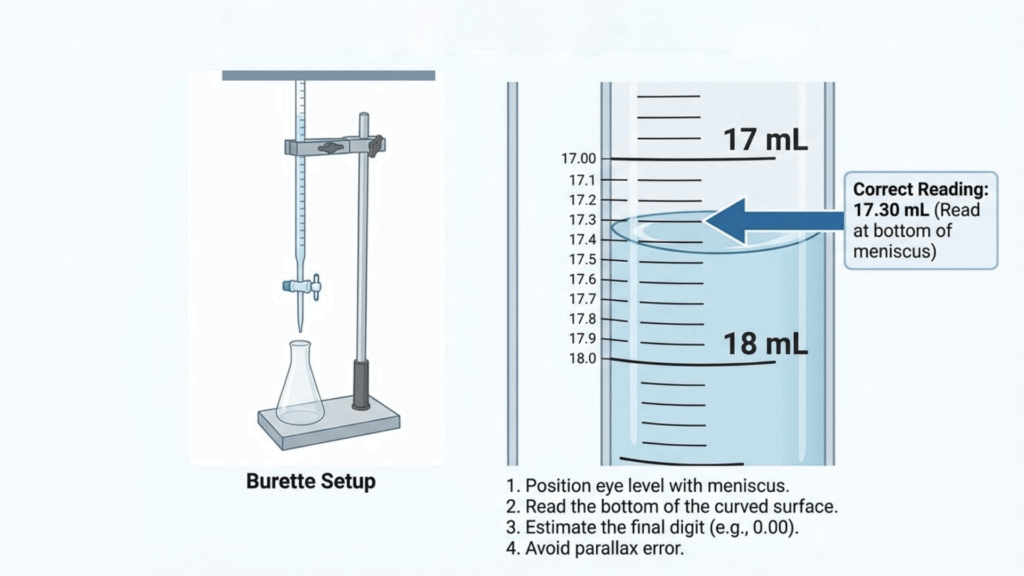
Fill it with distilled water and drain. A clean burette shows a continuous water film. If you see “beading” or isolated droplets, there is residual contamination.
The PTFE plug itself must remain grease‑free. However, a tiny amount of grease on the O‑rings or threads can improve motion without contaminating the titrant.
Replace it if you see structural damage, persistent cloudiness (etching), unreadable graduations, or a stopcock that continues to leak after servicing. At that point, the cost of error is higher than the cost of new glassware.
Time for a replacement? If your cleaning routine isn’t restoring accuracy, browse our range of Class A Borosilicate Burettes at Osmosis Scientific.


1 Comment